I've always been interested in getting into tweak development, but I've been busy doing other things, and I've also not had a jailbroken iPhone (sigh). A few days ago, I got my golden chance. It was a request on the r/jailbreak subreddit, asking for a tweak to enable browsing the filesystem using the Safari browser through the file:// protocol/scheme. I imagined it was a simple tweak to develop, which would be suitable for a first time tweak.
The Problem
Normally, the Safari app on iOS, doesn't allow viewing files in the filesystem. If you would attempt to browse a local file, using an URL like file:///path/to/my/file, you would be greeted with a message:
 |
| The error message displayed in iOS 9.3.3 |
Our mission is to grab the MobileSafari binary from our iDevice, and then find out where in the app this alert is triggered.
Prerequisites
We really need to talk about the prerequisites to following this tutorial. First of all, it is a no brainer that you need to know Objective-C. It follows that you also need to know a little bit of C. I'm not saying you should be able to write a compiler in C — you only need to understand the basics, and preferably be able to write a simple class in Objective-C.
Now, for this tutorial, you won't need to know ARM assembly — I know I don't (albeit I do have experience with x86 assembly). ARM assembly is a must if you wish to become a good mobile reverser, however. Also, you will need a disassembler. I'll be using a trial version of Hopper (
https://hopperapp.com), but feel free to use what you have. Hex Rays (
https://hex-rays.com) also offers IDA as a demo version which is known to work with 32 bit binaries (it doesn't work with 64 bit binaries).
Next, you need to have Theos set up in your development environment. I won't go into the details of setting up Theos, but I might do so in another post.
Lastly, you need to have a jailbroken iOS device, which I suppose you already do.
Examining the Binary
Now that we are ready, let's first retrieve the binary for Safari. In order to do that, connect to your iOS device with your favorite SCP client, and retrieve the following file:
/Applications/MobileSafari.app/MobileSafari
Now let's load the binary in our disassembler. The first thing to do after loading the binary, is to search for the error string that Safari shows when we try to browse the filesystem. Hopper has a very nice user interface — it allows us to quickly search for a string within the binary, on its left pane.
 |
| Search results |
We search for the string "local file", and the first result in the list is actually the string we are looking for. So we go ahead and double click it — this takes us to the location of the string in the disassembly.
Now that we found the string, we need to find the part of the code which accesses the string. Hopper is once again very useful: we click on the address (
0x1001698ac), and then press the 'x' key. This shows us the list of the parts of the code which have references to the string we found.
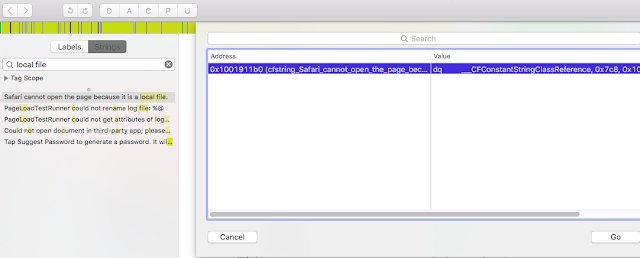 |
| List of references to our string |
As we can see, there is only one reference to the string we found. We select the only result, and then click on the Go button. This will take us, in the disassembly, to the part of code which accesses our string.
 |
| Code that references our string |
I know you might be puzzled about what this is. First of all, notice that there is a bunch of similar things, prefixed by the
dq pseudo-instruction, which stands for
declare-quad (word). We can see that between each line there is a difference of
0x10, or 16 bytes. So each line, or entry, is made of 16 bytes, or 4 words. Each word represents a thing. We are dealing with some sort of internal representation of strings. Each entry is made of the type, which for the string is
___CFConstantStringClassReference, a word which should be a bunch of flags for internal purposes which seems to be the same:
0x7c8 (I'm not sure about it, nor do we care), another word which is the actual address of the string literal (does
0x1001698ac ring a bell?), and finally another word which seems to be the length of our string. Indeed,
0x37 is 55 in decimal, which just happens to be the length of the error string.
Let's click on the address once again (
0x1001911b0, it's highlighted in the screenshot above), and press 'x' once again.
 |
| Code that uses our string finally shows up |
We get this nice popup once again, and this time we found our target. We can see that it is a method in the
TabDocument class which starts with
_decidePolicyForAction. Let's click on the Go button, and find out its full name.
This time we will land on real code in the disassembly. What we need to do is scroll up until we see that "Beginning of Procedure" thing that Hopper nicely shows for us.
 |
| The method we should place our hook on |
There it is, in all its glory, the method which shows us that nasty popup when we try to browse our filesystem from Safari. This means we should hook onto this method, in order to defeat Safari and make it obey to us. So our target method is
_decidePolicyForAction:request:inMainFrame:forNewWindow:currentURLIsFileURL:decisionHandler: of the
TabDocument class.
But what should we do, specifically?
A Little Bit of Theo(s)ry
Before we can start working on anything, we should create the project for our tweak. Open up your terminal, and type $THEOS/bin/nic.pl. Theos will prompt you for the basic configuration needed:
Eltons-iMac:arm Elton$ $THEOS/bin/nic.pl
NIC 2.0 - New Instance Creator
------------------------------
[1.] iphone/activator_event
[2.] iphone/application_modern
[3.] iphone/cydget
[4.] iphone/flipswitch_switch
[5.] iphone/framework
[6.] iphone/ios7_notification_center_widget
[7.] iphone/library
[8.] iphone/notification_center_widget
[9.] iphone/preference_bundle_modern
[10.] iphone/tool
[11.] iphone/tweak
[12.] iphone/xpc_service
Choose a Template (required): 11
So initially Theos asks you for the template. Here we enter 11, because we want to write a tweak.
Project Name (required): fileProto
It also asks you for the project name, which you can feel free to change :)
Package Name [com.yourcompany.fileProto]: com.youcanchangeit.fileproto
Next is the package name, which you can choose to change (recommended).
Author/Maintainer Name [Default Name]: Your Name
Next it asks you for the author's name.
[iphone/tweak] MobileSubstrate Bundle filter [com.apple.springboard]: com.apple.mobilesafari
This is the bundle filter for the process we are going to hook onto. We enter com.apple.mobilesafari, which is the bundle filter for the MobileSafari process.
[iphone/tweak] List of applications to terminate upon installation (space-separated, '-' for none) [SpringBoard]: MobileSafari
Here is the list of applications which should be terminated upon our tweak's installation, so that the tweak is loaded. We enter MobileSafari, because we want Safari to restart so that our tweak get's loaded.
Instantiating iphone/tweak in fileProto/...
Done.
And, this is it. The tweak project is set up in the fileProto directory (or whatever the project name you chose was).
The project directory structure is rather simple: there is control, which is just a text file containing meta-data about our tweak, Makefile, which is used by Theos in the build process, projectName.plist (in my case fileProto.plist), and also the Tweak.xm file. We will only play with the Tweak.xm file, where the source code of our tweak will reside. This file also contains some comments which help you when you're writing your first tweak.
I know you can't wait to get your hands dirty, so let's learn just enough Logos for our purposes. Logos is the set of directives which we use in our tweak code to enable them to hook on methods we choose, and it looks pretty nice, too.
The directives start with a % symbol, followed by the directive name. We are going to use only four directives: %hook, %orig and %log...%end. I placed %end intentionally where it belongs, in the end. Let's now see how these directives are used.
The %hook directive is used to hook onto a specific class. So we create what is called a hook block, and we place all the methods we want to hook onto, inside this block.
%hook ClassName
    -(void) methodName {
        // yay! we hooked on a method
    }
%end
The hook block is closed with the
%end directive. Inside the block we place the method we are going to replace (the method must exist, obviously). There are ways to add
new methods, but this is out of the scope of this post. The
%hook directive will automatically include the
ClassName.h header. So where do we get this header? Well, we could use a tool named
class-dump, or search the web if some nice guy has already uploaded the headers somewhere (There's also class-dump-z, but I used class-dump as I'm on a Hackintosh). Using class-dump is really easy, all you have to do is type the command:
Eltons-iMac:arm Elton$ ./class-dump MobileSafari > MobileSafari.h
This will dump the headers of our MobileSafari binary into MobileSafari.h. Now we have some housecleaning to do. Open MobileSafari.h, and find the string @interface TabDocument. Now delete everything above this string. Now find the string @end. Delete everything below this string. Now we are left with the header of the TabDocument class only. But, we can take it further.
Replace the long string in the beginning @interface TabDocument : NSObject <AppBannerMetaTagContentObserver... (until the first curly bracket {), with simply @interface TabDocument. Now delete everything between the curly braces. Next, delete everything between @interface TabDocument and @end, except for the definition of our method, which should look like this:
- (void)_decidePolicyForAction:(id)arg1 request:(id)arg2 inMainFrame:(_Bool)arg3 forNewWindow:(_Bool)arg4 currentURLIsFileURL:(_Bool)arg5 decisionHandler:(CDUnknownBlockType)arg6;
Lastly, replace CDUnknownBlockType with id. Now save the header. The header file should now look like this:
@interface TabDocument

- (void)_decidePolicyForAction:(id)arg1 request:(id)arg2 inMainFrame:(_Bool)arg3 forNewWindow:(_Bool)arg4 currentURLIsFileURL:(_Bool)arg5 decisionHandler:(id)arg6;

@end
Now feel free to rename
MobileSafari.h into
TabDocument.h, this way the header can be included automatically.
Now we are going to use
%log and
%orig.
%log is used to log all the parameters, whereas
%orig is used to call the original version of the function we are hooked onto. Right now we are going to hook onto the method we found earlier, log all the arguments and then call the original function.
So let's load our
Tweak.xm file and write this code:
%hook TabDocument
    - (void)_decidePolicyForAction:(id)arg1 request:(id)arg2 inMainFrame:(_Bool)arg3 forNewWindow:(_Bool)arg4 currentURLIsFileURL:(_Bool)arg5 decisionHandler:(id)arg6 {
        %log;  // this is enough to log all our arguments :)
        %orig; // and this is all that's needed to call the original function with the original arguments
    }
%end
We can see how easy Logos makes it to log the arguments and call the original function with the supplied arguments. Now let's build our tweak and install it, by opening the terminal, changing the working directory to the directory of our project, and then running:
make package install
This will compile our tweak, build the deb package inside the packages folder, and then install it into our device. Next, we should open up Safari, browse to a URL like
file:///test and then inspect syslog for the logged arguments.
Here is a good article which explains how to read syslog on your iDevice.
You should be able to find something like the following in your syslog:
Sep 4 23:09:20 Eltons-iPhone MobileSafari[6377] <Notice>: [fileProto] Tweak.xm:4 DEBUG: ...
Something of interest in the log message is the
request argument: there we can see that this is actually of type
NSMutableURLRequest. Also, it is important to notice that
currentURLIsFileURL has a value of
0, so it probably doesn't do what it looks like it does. My first thought was actually to set this argument to
NO, but it was
NO already, i.e.
0.
Writing the Tweak
We concluded the previous section with a brief note about two seemingly important arguments, where one argument was actually useless.
Now, we could attempt to rewrite the whole method we hooked onto, but that would be too difficult: I promised we won't need ARM disassembling skills. Well, there is an easier way.
By using our critical thinking skills, we can conclude that, since
currentURLIsFileURL is useless, the only argument that has information about the URL being visited is the
request argument. So, if we mess with that argument, and temporarily set the URL to a fake URL, perhaps we could get away with it and have a working tweak. Sounds like a plan.
%hook TabDocument
    - (void)_decidePolicyForAction:(id)arg1 request:(id)arg2 inMainFrame:(_Bool)arg3 forNewWindow:(_Bool)arg4 currentURLIsFileURL:(_Bool)arg5 decisionHandler:(id)arg6 {
        NSURL *originalUrl = [arg2 URL];

        BOOL urlStartsWithFile = [[originalUrl absoluteString] hasPrefix:@"file://"];

        // only make the change if the URL starts with file://
        if (urlStartsWithFile) {
            // set a fake URL
            [arg2 setURL:[NSURL URLWithString:@"http://www.google.com"]];
        }

        %orig; // let the original function think we're visiting google :D

        if (urlStartsWithFile) {
             [arg2 setURL:originalUrl]; // restore the original URL if it was changed
        }
    }
%end
So we first save the original URL, and then we check if it starts with the file:// prefix. If so, we change the URL temporarily to google.com, so that the original function doesn't know we're actually trying to view a local file. Next we call the original function, and finally we restore the original URL if it was changed.
Let's build the tweak and install it with:
make package install
Now, let's create a file in our device, by
ssh-ing into our device and typing:
echo "hi" > /var/tmp/pwn.txt
The final test is approaching. Open up Safari, and browse to the following URL:
file:///var/tmp/pwn.txt
You should be greeted with something like below:
 |
| Congratulations! |
This means our small tweak has done its job. You deserve to pat yourself on the back.
Final Words
We took a first look at tweak development with Theos. We saw how we can take a binary from our device and reverse it to find out more. We generated the headers, took a quick look at Logos, gathered information about the arguments of our target method, devised a simple strategy, and finally we developed our tweak.
You can find the source code of the fileProto project
in github. Note: the source code may be a little bit different from what we've presented here, but the idea remains the same.


